Gradient descent, by hand
An interactive, scrollable explainer: watch gradient descent pick its way down a loss surface as you change the learning rate, the momentum, and where it starts.
Gradient descent, by hand
Almost every model you have ever trained was fit the same way: start somewhere, look at which way is downhill, take a step, repeat. That is gradient descent, and it is small enough to watch happen. On this page you can change the step size, add some momentum, drag the starting point around the slope, and see where the little ball rolls.
We will descend one awkward surface throughout: a long, narrow valley. It shows why the step size is hard to get right and why momentum was invented, and it is simple enough that we can write its slope down by hand in a moment.
Play with it first
In the picture below, the rings are contours of the loss, low in the middle and high at the edges. The dot is where descent starts, and the line is the path it takes. Drag the dot anywhere on the slope; nudge the three sliders. Push the step size high enough and watch the path stop converging and start ricocheting across the valley.
The slope, written down
The surface you were just playing on has a simple formula. Writing for a point on it, the loss is
The factor of six sets the shape of the problem. Move the same small distance away from the floor along or along , and the direction costs six times as much loss. The rings show the resulting long, narrow trough, gentle along its length and steep across it.
The direction of steepest ascent is the gradient, the vector of partial derivatives, which for this loss is short enough to read off by hand:
Gradient descent walks the other way. It takes a fixed fraction of the gradient, the step size (or learning rate), and subtracts it:
Figure 1 draws one such step. At a point up on the slope, points inward, toward the floor, and a step of length carries you part of the way there.
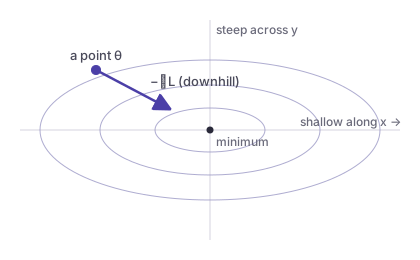
The same multiplies both components of the gradient, but the two components live on different scales: the component is , the component only . A step size gentle enough to crawl along the shallow direction barely moves; make it big enough to move usefully and it can overshoot the steep walls entirely. The step size slider lets you feel that tension.
One step at a time
The playground shows the whole path at once. To see why it bends the way it does, step through the five scenes below: the picture redraws for each one, from the bare landscape to a full run and, finally, to a run that falls apart.
The landscape. The rings are the loss. Descent begins at the marked point, high on the steep left wall of the valley. Everything that follows is a rule for getting from there to the dark point in the middle.
Which way is downhill. At the start point, the negative gradient points almost straight across the valley, not along it. The steepest direction is rarely the direction of the minimum.
One step. Multiply that direction by the step size and move. With a modest the first step lands well down the wall but overshoots the floor slightly, ending up on the far side. The path has already started to zig-zag.
Many steps. Repeat, and the zig-zags shrink as the walls get shallower near the floor. The path settles into the trough and crawls the long way toward the minimum. It works, but notice how much of the effort went sideways.
Too far. Now push the step size past the edge. Each step across the valley is longer than the last; instead of settling, the path climbs the opposite wall higher every time and ricochets out of the frame. The rule and the surface are the same as before; only the step size is too large.
Choosing the step size
Watching the path is one way to judge a step size; watching the loss fall is another, and often clearer. The chart below plots the loss at each iteration for whatever the three sliders are set to right now. A healthy run drops fast and flattens near zero; a too-large one bottoms out early and then climbs, the curve turning back upward as the path escapes the valley.
For a quadratic like this one, plain gradient descent converges only while , where is the largest curvature, here the of the steep direction. That puts the ceiling at . Below it, smaller is safer but slower; above it, no amount of patience helps. Most of the art of training is keeping under a ceiling you cannot see directly.
Momentum
The slow part of every run above was the crawl along the valley floor, where the gradient is tiny and each step barely moves. Momentum fixes this by giving the ball inertia: instead of stepping by the gradient alone, it accumulates a velocity that carries over from step to step,
The friction term (the momentum slider) decides how much of the past velocity survives. Along the shallow floor the gradient keeps pointing the same way, so the velocity builds and the ball rolls faster; across the steep walls the gradient keeps flipping sign, so those contributions cancel and the wobble is damped. Figure 2 shows both runs from the same start for the same number of steps: plain descent is still short of the minimum while the momentum run has arrived.
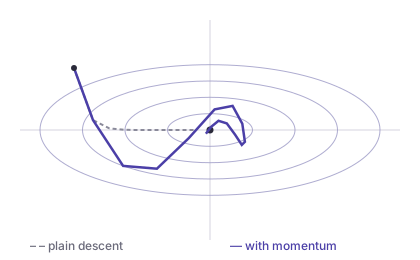
Scroll back to the playground and raise the momentum slider on a run that was converging slowly: the same now reaches the floor in far fewer steps. Push it too high, though, and momentum overshoots on its own, a third way to make the path unstable.
What to carry away
- Steepest is not shortest. The negative gradient points across the valley, not at the minimum, so descent zig-zags. Curvature, not distance, sets the direction.
- The step size has a ceiling. One number, shared across every parameter, has to be small enough for the steepest direction and is therefore usually too small for the rest. Cross the ceiling and the run diverges no matter what.
- Momentum shortens the crawl. Accumulating velocity accelerates the shallow directions and cancels the wobble in the steep ones, which is why nearly every modern optimizer keeps some form of it.
Every trick that came later (adaptive rates, per-parameter scaling, learning-rate schedules) is a more careful answer to the questions you worked through by hand here: which way to step, and how far.